Thursday, January 27, 2011

Welcome to the OG Laboratories: Vol. I

There’s this game I like to play. I call it “Good or Weird.” The game goes something like this- I come up with some strange recipe, outlandish flavor combination, or non-traditional way of using Outdoor Gourmet grilling schwag, then I feed my culinary oddity to whoever happens to be around, then intently watch them eat it.

“Good or weird?” I ask. More often than not, the answer is “good,” but I get my share of “weird” and more than a couple “weird, but good.”

This game of gastronomic roulette is made all the more exciting because I have the Outdoor Gourmet manufacturing facility at my disposal. If there is an apparatus made of wood that can be used in preparation of food, I can (and do) get a stack made up to go all Dr. Frankenstein on. So, here is a peak into the OG laboratories / test kitchens- the Baking Plank episode.

Baking Planks are basically just larger, thicker grilling planks- approximately 13” x 17” x 1.25”. I had  several wood flavors made up- Cedar, Cherry, Alder, and Maple.

You could soak one of these baking planks and use it just like a heftier grilling plank, but I wanted this to be reusable, so I opted to cure one of the Alder Baking Planks.

How to cure your Baking Planks
(This is basically the same concept as seasoning a cast iron.)
You will need...


- Baking Plank
- Vegetable Oil: I recommend safflower oil, grape seed oil, canola oil, or some other high 
smoking-point oil. Do NOT use mineral oil, linseed oil, butter, lard, or bacon grease. Just don't. 

- Wire Cooling Rack

- Broiler Pan 

- Rag / Basting Brush
 
Directions

1. Apply liberal amounts of oil over plank both sides, coating evenly and paying special attention to the ends. I suggest a "wax on, wax off" method. Let stand on cooling rack for 10 minutes, then give it one more coat, going with the wood grain.

2. Preheat oven to 300°, then place oiled plank on the broiler pan in oven and cook for 20 mins., then flip and cook for another 20 mins. Note: If you hear any snaps, crackles or pops, it's cool. That happens.

3. Remove from oven and allow to cool for 5 mins. Lightly coat with a bit more oil to seal. Now you have a reusable baking plank suitable for a "dry planking process."

Ok, now you have a baking plank. What to make?
Oven Planked Pitas and/or Pizza
Ingredients

3 cups flour
1 1/2 teaspoons salt
1 Tablespoon sugar or honey
1 packet yeast (or, if from bulk, 2 teaspoons yeast)
1 1/4 to 1 1/2 cups water, roughly at room temperature
2 tablespoons olive oil or vegetable oil

1. Activate yeast, then mix with flour, salt, and sugar. Add olive oil and 1 ¼ cup of water. Mix with a wooden spoon. If all the flour doesn’t stick, add a touch more water.

2. Place ball on work surface and knead and mix on low with dough hook for 10 minutes, then place in lightly oiled bowl and roll ball around to coat with oil. Cover bowl with plastic wrap or damp towel to rise until it has doubled in size (90-ish minutes). Once it has risen, punch it down, then roll into 8 pieces and cover for another 20 minutes.

3. Preheat oven to 400 degrees. Oil your baking plank and place on middle oven rack.

4. Sprinkle some flour on work surface and roll your dough balls out to rounds. They should be about 1/6 inch thick.

5. Open oven and place two or more pitas at a time on your plank and bake for 3 to 5 minutes, depending on how cooked / blistered you like your pitas. Note: Your pitas will puff up almost immediately. This is good, "we-don’t-have-a-TV"entertainment.
6. Remove from oven, cool, and enjoy with last week's Cedar Plank Roasted Garlic Hummus.

Or you could use pretty much any pizza dough recipe in the same way and top with your favorite sauce, cheese, and toppings.


For this round, I used fresh Mozzarella, Sage Monterey Jack, Grape Tomatoes, and Arugula topped with White Truffle Oil.
Welcome to your weekend. -KB

Friday, January 21, 2011

Going Greek

For this week's entry, we're going a little Greek.  Homemade Pitas with Hummus and Tzatiki with Greek Salad.

Plank Roasted Garlic
(Why have I not thought of this before!? So easy, so delicious.) 

First- Soak Outdoor Gourmet Fromagier Line Cedar Plank for an hour or more.

Next- Heat up your grill to Medium Heat (300°) and cut the top off of a whole bulb of garlic.

Then- Drizzle with oilve oil and place sliced-side down on plank, then cover with foil.  Roast garlic on plank for about 30 minutes.

Finally- Remove foil and enjoy... or do what I did and add to hummus.


Plank Roasted Garlic Hummus Ingredients
  • Two 17 oz. cans of chick peas / garbanzo bean
  • 2 Tablespoons of Tahini
  • 1 bulb of plank roasted garlic
  • Juice of 2 lemons
  • 3 Tablespoons of sage
  • Salt and pepper to taste  
Directions: Combine all ingredients together in food processor and tweak season as you go.  Add cayenne pepper for an extra kick!
     
    Traditional Tzatziki
    • 3 tbsp. olive oil
    • 1 tbsp. vinegar
    • 2 cloves garlic, minced finely
    • 1/2 tsp. salt
    • 1/4 tsp. white pepper
    • 1 cup greek yogurt, strained
    • 1 cup sour cream
    • 2 cucumbers, peeled, seeded and diced
    • 1 tsp. chopped fresh dill
     
    But the planking doesn't end there...  Oven Planked Pita Bread, but that is next weeks recipe.  Here's a teaser photo.  Welcome to your weekend. -KB

    Tuesday, January 18, 2011

    Scholarly Oven Planking

    Note about the Guest Blogger- Dr. Katie 
    Dr. Katie Cooper is a professor of Geophysics at Washington State University. When she isn't rocking out (Geology joke!), she can be found at the bar, running, doing yoga, or with her nose in a scholarly, leather-bound book.   Thanks Dr. Katie!
    Planking during a blizzard - a night of Honey Adobo Chipotle Pepper Glazed Pork Chops with Sweet Potato Black Beans and Rice... and 18 inches of snow.

    I like challenges. Itʼs true; trust me, Iʼve done some crazy stuff just for sheer bragging rights. But grilling outside during a full-blown blizzard with sideways snow as my first attempt at planking? Yeah, count this Texan girl out. I had my set heart on some plank chops for a spectacular dinner, yet as the day progressed it became quickly apparent that I was either going to have to change my expectations or find a plan B.
    Plan B?

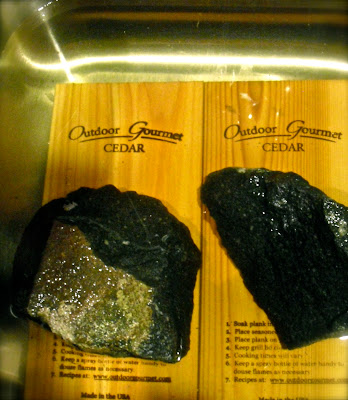
    Oven planking. Sure, itʼs not as exhilarating as playing with open flames (though there is an element of adrenaline-inducing anxiety that you might burn down your home), but itʼll suffice when your grill is covered with a foot of snow. So, I set to soaking my planks and pre-heating my oven to 350F. My preferred method of soaking calls upon the use of rocks. I am a geologist after all, and happen to have plenty at my disposal (Iʼve also used rocks as pie crust weights). If you really want to know, the rocks I used to weigh down the planks are high alumina olivine tholeites or if youʼre one of the cool kids, HAOT rocks (pronounced “hawt.” Like the dates I donʼt procure because of my geogeekery). So, while things are heating up and absorbing water (keep in mind you need to soak for at least an hour and your oven probably does not take an entire hour to reach 350F, so you might want to adjust your timing), I started prepping my glaze for the pork chops.
    The Glaze. 

    I went with a honey adobo chipotle pepper glaze based on a recommendation of a full-fledged hottie (not a HAOT-tie; no worries, I actually do land some dates when I shut up with the rock shop talk).

    The glaze sounds exotic, yet itʼs amazingly simple. You go buy yourself a can of chipotle chilies in adobo sauce (available in most grocery stores since I found it in the boondocks of Eastern Washington). Take one chili from the can and mush it up in a bowl, then add a spoonful or two of honey and adobo sauce (the sauce the chilies are packed in) and some chopped up green onions. Stir and then smear that delightful concoction on your pork chops and youʼre ready to go. That night I decided to pair the pork chops with black beans and rice with sweet potatoes, so I decided to plank the taters as well.
     
    The Tubers.
    Have you planked sweet potatoes? If not, I recommend you do so, stat (seriously itʼs just that good that I feel obliged to pull my doctor card and use terms like “stat” even though I technically can only employ that term during rock emergencies). For the sweet potatoes, I chopped them into chunks and drizzled them with olive oil and then added a sprinkling of kosher salt and ground pepper. They are amazing vehicles to take in all of that smokey flavor. So, so good! And I donʼt lie, folks.

    Prior to placing my prepped goodies on the plank, I greased those suckers up with olive oil to ensure less sticking on the plank and even more delicious flavoring. Then I crossed my fingers (that I wouldnʼt burn down my apartment) and slid the planks into the oven for some food science magic. I kept a close eye on the whole business for about an half hour until the sweet potatoes cooked to the desired tenderness (you should be able to easily spear them with a fork) and appropriate done-ness of the pork (use your own judgment and meat thermometer).
     
    The Plating. 

    I plated the meal with fresh avocado slices and a bit more of the adobo sauce. Delicious! As I mentioned before, the sweet potatoes picked up the amazing smokey cedar flavor and the plank chops showcased the sweet, caramelized flavor of the glaze. And to top it all off? It was super easy clean up! And I did not burn down the place! Phew!
    So in complete pride and self-satisfaction, I sat by the window with my tasty meal and smugly watched the snow come down. Hey you fluffy white stuff trying to keep me away from planking? Oh, I donʼt think so.   Welcome to your weekend.

    Friday, January 14, 2011

    Salmon prepared Outdoor Gourmet Western Red Cedar Plank


    I think I have writers block, which I hear is a prescibable ailment (at least in some states) these days, but I digress. After the month-long eat-athon that was my holiday season, I can’t seem to look my grill in the eye and I have been relying on my trustee guest bloggers to carry the load… but I really need to get back on it.  Plankers and soon-to-be plankers everywhere need me. But what to plank? Well, when that question arises, the only thing to do is to visit and revisit the mainstay-planked entrée:


    Wild Chinook Salmon prepared on an Wildwood Grilling Western Red Cedar Plank

    So, why does Cedar Planked Salmon have such staying power? 
    Let's talk salmon...
    Salmon, when prepared correctly, is high in protein and Omega-3 Fatty Acid. Both the Mayo Clinic and the American Heart Association list salmon on their Top Ten Heart-Healthy foods list.  It also appears on too many publications’ Super Food lists to mention.  That, and it’s delicious.

    Now, let's talk planking...
     
    Grilling Planks, cooking planks, grilling slabs, or whatever else you want to call them- preparing food on a water saturated piece of wood allows for indirect heat, slow cooking. 
    Research shows that slow cooking rather than high-heat cooking retains more nutrients in your food- frying, searing, and charring leeches, vitamins, minerals, fiber, and other essentials.

    Planking the healthy option because nutrients are retained, while your food is infused with moisture and essential cedar flavor and smoke, which are two separate flavor profiles. No additional oil or butter is needed when planking- just you filet and a squeeze of lemon.
    For these reasons, salmon and cedar grilling planks are a consummate pair.
     

    How to Plank Salmon...

    First- soak your Cedar Grilling Plank from Wildwood Grilling Outlet in water. An hour or two prior to grilling will work just fine, but a longer soak time permits the plank to absorb more moisture. This allows for more cedar-infused water vapor to be released during the grilling process.


    Then- get your grill up to medium heat (350-400 degrees). Place the wet plank on the pre-heated grill and heat plank for another 5 minutes before adding the filet. This allows the plank to begin to smolder and smoke.


    Next- place you salmon on plank and close grill lid. No flipping, turning, or tweeking is needed.  Remove when cooked to your liking. It's that easy.

    Leftovers, no problem! 
    Welcome to your weekend. -KB

    Thursday, January 6, 2011

    Walking the Cedar Plank

    Note about the guest blogger- Jake Donahue

    Jake is a man of many talents- he make a living as a designer, writer, photographer, multimedia-er (check out his stuff st www.jakedonahue.com)  but he makes a stir when at the grill. Thanks Jake!

    Salmon, salmon, salmon. When it comes to cedar plank grilling, it’s always salmon – be it covered in brown sugar or honey, barbecue sauce or herbs. Sockeye salmon. King salmon. Chinook, Coho and Pink salmon. That’s the only way you can use wood on top of a grill. 

    Cedar plank salmon, right?

    It got me thinking: If salmon tastes so great coming off a chunk of grilled timber, what about other meats? Like Pork? Chicken? Lamb? 

    Holy Toleto, what about steak?

    If you can churn out some of the best fish on a cedar plank it seemed to me that steak would be the obvious next choice. It’s already synonymous with barbecuing fame. If you simply separated the fire and meat by a layer of naturally-scented wood, the outcome would have to be magical. I decided to try.

    Picking a chunk of beef to use, however, would prove the most tedious chore. I wasn’t sure if I wanted a succulent ribeye or flavorsome New York strip. Filet mignon would have to be amazing, as well. But since I had never done this before, I decided to use a lesser, yet still worthy cut, the always tasty flank steak.

    Now I’m no grilling novice. Even at the young age of 26, I consider myself a barbecue veteran. Michael Jordan has yet to accomplish in the NBA what I’ve already done on my patio – when I open the lid to my Brinkman, people stand up. What’s more, my flank steak is legendary. Seriously.

    At first, I was scared to tinker with perfection. My marinated meat is seldom less than masterful. But by the same token, what better way to test a new technique than to rival a work of art. So instead of my usual preparation, I went at this sans any marinade. It would only cover the cedar scent if I were to drown my delightful concoction in any sauce of sorts.
    It would have to be a dry rub. But to avoid anything too dry, a baste would be in order.
    Having never used a cedar plank before, I decided to do the manly thing and throw caution to the wind. Instructions? Who needs ‘em? I’m sure a bath of no less than 60 minutes would surely suffice for the wood, followed by a quick pre-heat on a hot grill.

    (Nevertheless, Outdoor Gourmet makes instructions almost impossible to miss, as they’re etched directly on the plank!)

    I rubbed, seared, basted, grilled and cedar planked my flank steak to a perfect rare. Oh, sure, it looked absolutely amazing. You could have featured it on epicurious.com. But I was scared to try it.

    What if it was too dry or too tough? Normally I marinate flank steak for hours – there’s nothing more juicy or tender. My wife, who was about to be my test dummy on this new meat-torching technique, would certainly tell me if it sucked. I don’t know if I wanted to hear that. I don’t know if my ego could hear that.

    Before I thought about it too much longer, I manned up. I took the rarest, bloodiest chunk I could muster from the sliced meat, held my breath, closed my eyes and threw it in my mouth.
    It took less than a second to realize the mistake I just committed. Something was very seriously wrong. I had to try another piece to verify my gut reaction. Surely, I had to be wrong. What was going through my mind scared the living hell out of me. But I was right the first time. Still, I needed another bite. 

    One more, just to confirm. 

    Damn. I could not believe it. The biggest blunder I never considered just reared its ugly head. I was so preoccupied with how this couldn’t work that I never stopped to ponder how it could.
    And work, it did.

    Simply put, I have eaten no greater piece of meat. If there is a hall of fame for barbecuing, I can only assume it be built of cedar, for what I just did to this flank steak is the best thing to ever happen to flank steak.


    This was good. So friggin’ good. The best part? It was easy. So friggin’ easy.
    I can’t believe I went this long without ever trying cedar plank steak. I’m not sure I can go back to the “old” way of grilling, using just a metal grill and fire. Sizzling sirloin and flame-crusted ribeye be damned, you’re about to walk the cedar plank.
    And move over, salmon. Prepare for a steak through your heart.

    SWEET AND SPICY CEDAR PLANK FLANK STEAK
    (Big enough to serve 4, tasty enough for just 2)
    1 Grilling Plank from the Outlet Site
    DRY RUB
    2 Tbsp. Garlic Powder
    1 Tbsp. Pepper
    1 Tbsp. Onion Salt
    1 Tbsp. Chili Powder
    1 Tbsp. Brown Sugar
    1 Tbsp. Paprika
    1 Tbsp. Crushed Red Peppers
    BASTE
    1/3 Cup Sweet Chili Sauce
    1/4 Cup Zesty BBQ Sauce
    2 Tbsp. Minced Garlic
    1 Tbsp. Soy Sauce
    1 Tbsp. Honey

    STAR OF THE SHOW
    32-ounce flank steak
    1 Tbsp. Extra Virgin Olive Oil

    1. Soak cedar plank in water for one hour.

    2. In a small bowl, mix all dry rub ingredients. Then, cover steak in Extra Virgin Olive Oil, followed by the dry rub. Massage spices deep into the meat and let sit for 30 minutes.

    3. Preheat barbecue to High (500 degrees). Once hot, place cedar plank on grill for 5 minutes. While the plank is heating up, mix all ingredients for the baste with a fork.

    4. After the plank has heated, reduce heat to medium-high and sear both sides of steak directly on grill for 2 minutes. Flip cedar plank over so you can lay steak on the heated side of the wood. Generously brush on baste over the top of the steak. Reduce heat to medium-low and close lid.

    5. After 10 minutes, flip steak and brush with remaining baste, then close lid. Wait 10 minutes for Rare (perfect!), 15 for medium (meh) and 20 for well-done (why kill it twice!?).

    6. Pull plank and steak from grill and cover with foil for ten minutes before slicing. Using a sharp knife, thinly slice steak against the grain and serve with wild brown rice, red wine-sautéed mushrooms and chopped green onions. Enjoy!

    Sunday, January 2, 2011

    Previously Microwavable- Now Cedar Plankable

    Note about the guest blogger- Emily Craner

    Emily Craner is a student at Eastern Washington University on the very cusp of graduation. When her nose isn't in her school books, Emily can be found skiing at Schweitzer Mountain Resort or taking pictures of her weiner dog, Valentine.  Thanks for the great blog, Emily! This a refreshing break from all that holiday prepping, cooking, and gluttony thereafter.

    For those who feel frightened by words such as “lemon pepper," “filet," or “braise,” I present to you ways in which to enjoy your favorite, previously microwavable delicacies via cedar plank cooking. There is a certain comfort in frozen food. It wont judge you. It doesn't take any previous culinary knowledge or skill. Also, it is cost-effective, for those days when one cannot afford a Kobe beef flank.

    People generally eat microwavable food for three reasons:
    1) they are in a time crunch, and it's the easiest option
    2) they fear cooking, for various reasons or
    3) they actually love that gooey, familiar taste of processed food.

    I fall into categories two and three.

    My first experiment was with the classic frozen burrito, considered a favorite by many since the first combining of cheese and refried beans. I soaked the plank for two hours, and forgot to preheat the grill. This didn't seem to end up being an issue, because my burrito was a crisp, golden brown within twenty minutes. I kept a spray bottle nearby, as instructed. Good thing, too, because burrito and plank burst into flame four times (I didn't mind. This made me feel like Bobby Flay, throwing down in an extreme cook-off). I think, also, it would have been wise to let it thaw a bit, instead of just plunking down a rock-hard burrito on the plank. Aside from these minor set backs, it was the most delectable burrito I have ever eaten. The tortilla had a distinctly smoky wood flavor, and a delicious crunch. It was so mouth watering I could hardly contain my excitement, wanting to shout from the rooftops about how incredible my planked frozen burrito had turned out. I paired it with a chilled MGD. Mama Mia!


    The second planking experiment involved a hot pocket. Feeling fancy considering I was cooking on a cedar plank, I decided to opt for turkey and cheddar, as opposed to my usual pepperoni pizza. Yes, I have a usual. Anyway, this was proved to be a great decision. The cedar complimented the turkey amazingly, giving it a crunchy, flavorful shell. Never has a hot pocket tasted so exquisite. This time around, I learned from previous mistakes, and let the hot pocket thaw first for half an hour. It only ended up taking me about ten to fifteen minutes to grill it. It was hot inside, but not bubbling hot. It could certainly have been left on the grill for an additional five minutes depending on preference, but it was delicious nonetheless. It tasted like I had baked the bread, harvested the broccoli off of my organic farm, and killed and plucked the turkey myself. I.e., it tasted home made.

    I've got to say that my final experiment was my favorite. Corn dog! I thawed the dog for half an hour before wrapping it in a cedar wrap that had soaked for half an hour. Cook time was only twelve minutes, and good thing. This was the most delectable scent coming from the grill, wafting through the cold winter air, making my mouth water uncontrollably. I unwrapped it, smothered it in mustard, and had a feast of epic proportions. It was so scrumptious. If you never thought the word “scrumptious” could describe a corn dog, think again! The dog paired nicely with a refreshing glass of Antioxidant Cherry 7-Up over ice. I think it might be important for one to antioxidize after ingesting a frozen burrito, hot pocket, and a corn dog.