Sunday, October 31, 2010

Make it a Happy Halloween with Planked Pumpkin Pie.

Note about the guest blogger- Crysta Evanenko.

Crysta lives and attends nursing school in Walla Walla, Washington. She is a planking aficionado, love pie with good coffe, and is the owner of often-featured Trucker- the Trusty Labra-Mutt. Thanks for the great recipe, Crysta!

Pumpkin pie- so seasonal and not just for breakfast anymore! There is nothing better than a slice of homemade pumpkin pie, a dollop of whipped cream and a cup or two of coffee. Yes, I realize that there are “real” holidays that each have special significances ‘round this time of year, but for me, pumpkin pie is the reason for the season.

Around my place, it's easy to know when the holiday season is starting to ramp up- Mom starts complaining about the size of her kitchen; “it’s too small” “I need another oven” or “get the heck out of here! I’m trying to cook!”. This year, I started thinking about how I could help contribute to the holiday fare without taking up precious kitchen space.

Brilliance struck! I could plank pumpkin on the grill and save a ton of time. Brilliant and delicious! I rummaged through my cache of grilling planks and couldn’t decide on a wood type, so I tried a few. Grill-based trial and error brought me to a discovery- I wouldn’t recommend using a cedar or hickory planks with something as delicately flavored as pumpkin. I found these more distinctive wood flavors overpowered the “squashiness” that I wanted to come through in my pie. On the other hand, Trucker the trusty Labra-mutt was one happy pooch, as he was the beneficiary of several batches of test pumpkin.
After several trial grilling sessions, I settled on the Outdoor Gourmet Maple Grilling Planks as the wood flavor best for my purpose. My pumpkin was lightly infused with subtle, sweet maple wood smoke flavor. And Mom was so impressed by my “out of the kitchen” thinking- we had a very nice, planked pumpkin pie breakfast together.
So here is how it’s done…
Maple-Planked Pumpkin Pie Filling!
Ingredients

2 c. cooked pumpkin
1 can evaporated milk

3 teas. pumpkin pie spice

1 T. cinnamon

2 teas. ground ginger

½ c. real maple syrup

1/4 c. brown sugar (if you like your pies sweeter, add ¼ c more sugar)

2 eggs


Directions

First thing you need to do is- pick up a sugar pumpkin from your local grocery store, farmers market, or neighbor’s pumpkin patch. Sugar pumpkins are smaller and have a stronger pumpkin flavor than a carving pumpkin. You’re also going to need a couple Outdoor Gourmet maple grilling planks. It’s best to soak the planks overnight because maple is a hard wood.
Next- Preheat grill to medium heat (300 degrees). Scrub, split and seed your sugar pumpkin. Put aside your seeds to bake them off in your oven with a little salt and have a delicious snack. Cover pre-soaked planks and seeded pumpkin halves with aluminum foil. The pumpkin flesh should be face down on the planks- aids in absorbing smoke and maple infused water vapor. The stick in on the grill!

Then- Smoke for 15-25 mins. and carefully remove planks and pumpkin from grill. A knife should easily slide though the pumpkin. Open the tin foil and let the pumpkin to cool down. Scoop out the pumpkin meat being careful not to include the skin. I recommend using a food processer to make the pumpkin smooth and creamy. You now have pumpkin for a pie filling!

Add- all ingredients, excluding the eggs. Fold together and taste. If the balance of spices if to you liking, add eggs. If not, please feel free to add more or less of any of the spices for your family’s taste.

Pour filling into pie crust.In my family we use the Krusties’ pie mix and all we have to do is add water and end up with beautiful crusty/tasty pie crust. The only place we have found it is at Cash n’ Carry, but I would recommend asking your local grocery store to stock it. It is fantastic time saver.

Finally- Bake for 35 to 40 mins. at 400 degrees. Allow to cool, then top with something good or enjoy this pie as a stand-alone. Enjoy!
Welcome to your weekend! -CE


Wednesday, October 20, 2010

Grilling Planks- not just for fish!

It's steelhead season again, but one shouldn't live on planked fish alone. Believe me- I've tried. So, here is a recipe that pairs great WITH cedar planked steelhead or salmon.


Maple Planked Stuffed Mushrooms

Ingredients

2 Maple or Cedar Grilling Planks from our Outlet Store
12 baby portabella (crimini) mushrooms
1 cup fresh bread crumbs
1 cup Manchego
1 tbs. finely chopped rosemary
2 tbs. olive oil
2 pieces cooked pieces of bacon.
Salt and freshly ground pepper to taste

Directions

First- Soak grilling planks for an hour or more.

Then- Roughly mix together breadcrumbs, cheese, rosemary, salt and pepper. Remove stems from mushrooms; brush caps with olive oil and fill with cheese, breadcrumb and herb mixture. Garnish with bacon.

Next- Place stuffed mushrooms on soaked plank and set plank and mushrooms on preheated medium-high (400°) grill. Keep lid closed and remove in 15-20 minutes.

Finally- Remove carefully and enjoy!
Welcome to your weekend! -KB

Thursday, October 14, 2010

How 'bout them Apples

Chelan County, WA- possibly the appleiest place is Washington, which is saying something, as Washington State is the true “big apple” and home of the Apple Cup. (Go Cougs!) So, when I was invited to a cider pressing party, I naturally headed for the smack-dab center of the state to collect the necessary supplies.One stop at Smallwood’s Harvest in Peshastin, WA and 800 lbs. of Golden Delicious later, I was set, so onward and westward!

Golden D’s, while sporting a great juice to skin/pulp ratio, tend to be sweet, yet simple, with little else to offer in regards to flavor profiles. As their coloring and sweet simplicity would suggest, they tend to be the dumb blondes of the horticultural world. So, my truckload of apples provided a good base. Now we just needed to add some interest to the mix. That’s where the other truck of miscellaneous heirloom varietals from an old-growth orchard there on the west side came in handy.

The cider pressing was divided into six different stations, that is, if you don’t count the fine people manning the BBQ pit and just hangin’ around for some nosh and spirited conversation.

And those six stations were as follows…

1. Rinse tub: the apples went from the truck bed, directly into a bathtub full of H2O.

2. Chopping station: the fruit was sorted and quartered.

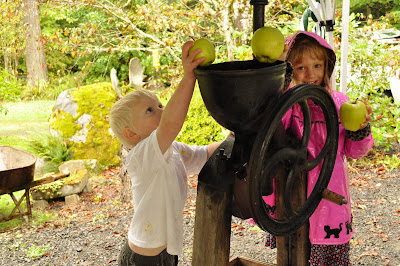
3. Grinder: the apple sections were sent through the hand-cranked grinder and converted into mash.

4. Press: the mash was squeezed for as much of it’s liquid content as possible with a hand-powered crank.

5. Bottling: the freshly pressed juice was then filtered and bottled.

6. Compost: the remaining mash was then sent to the compost pile.
The cast iron and wooden cider press that we used was built in 1853. Mike Johnson, one of the hosts of the party commented “you can’t exactly go out and pick up parts for one of these.” Which is fine because the press worked splendidly and looks as if it will keep on pressin’ for another 157 years.
An estimated 100-ish gallons of cider was pressed that day and I will go to extreme measures to be invited to this fall fest again in 2011. I headed back with a plenty of cider to drop to any of my friends and family quick enough to respond to my mass text-odus reading “Hear ye, hear ye- freshly pressed cider delivery today only for those who have their own glass containers.”

The rest I took home to hoard and of course, find creative ways to plank with… which leads me to this week’s recipe.

Cedar Planked McIntosh Apples stuffed with Cranberries and Italian Plums… but wait! Soak the planks in cider for an extra-apple-y kick.
First: Soak Cedar or Maple Grilling Planks in cider (water will work just fine too) for an hour of more.

Next: Glaze 3 cup of cranberries and 1 cup of quartered Italian plums in a simple brown sugar, Cabernet, and butter reduction.

Then: Core apples, but leave some bottom portion to hold stuffing. Set apples on soaked cedar/maple grilling plank, then stuff with plum and cranberry mix.

Now: Place on preheated Medium-High (400°) grill and close lid. Let cook for 12-15 minutes.

Finally: Remove carefully and serve with freshly-made whipped cream or vanilla ice cream. Enjoy!

Welcome to your weekend! -KB

Thursday, October 7, 2010

Mushroom Madness

Chanterelles: hunted, gathered, cleaned, transported, and dehydrated- check, check, and check. Two heaping coolers full of mushrooms shriveled away to only about a popcorn bowl of dehydrated fungi.
We’ve sautéed, sauced, and souped these ‘shrooms into all sorts of delicious dishes. So now what? Pair them with something planked! Duh!

We here at the Outdoor Gourmet just released a new type of grilling product- The OG Fromagier Line Cedar and Maple Planks. As the name suggests, these are planks meant specifically for smoking and serving cheese and there is no better combination than wild mushrooms and brie. But before we get to my newly made up recipe, a crash course in the joys of planking fromage.

First: Soak 7 x 7 Outdoor Gourmet Fromagier Line Cedar or Maple for an hour or more. Preheat grill to Medium-High (400°).

Next: Place cheese of choice (brie, camembert, cheddar, bleu, etc.) on soaked plank. Cover cheese with topping of your choice- berries, nut with honey, or a balsamic reduction are all delicious options, but in this recipe, I will be using a Chanterelle Tapenade.

Then: Place plank with cheese on the grill and close lid. Planks will smolder and smoke when applied to direct heat. This is how the cheese will be infused with a subtle, savory flavor. Smoke 12-17 minutes, until cheese is golden brown (slightly puffy, if it has a rind) topping is hot and almonds are light golden brown. Remove plank from grill and allow to cool for 1-2 minutes.


Finally: Serve immediately with fresh sliced baguette, a few big spoons, and lots of napkins!

Note: If flames occur, don't panic! When wood, even wet wood, is applied to flames, it tends to catch on fire. It's ok- just sprinkle with water and keep on plankin'. Also, cupping of the plank is completely normal, especially with the hardwoods, as shown in the picture below.

Maple Planked Brie Topped with Chanterelle Tapenade
Ingredients

1 round of brie or camembert (preparation instructions above)
1 cup dehydrated wild mushrooms
3 tablespoons of butter
1 cup red wine
2 clove minced garlic
olive oil and balsamic vinegar

1. Soak mushrooms in red wine until rehydrated- an hour or more.

2. Heat pan to medium high heat, add butter, rehydrated mushrooms, and whatever wine the mushrooms did not absorb. Sauté for 7-8 minutes, then add minced garlic.

3. Remove from heat and place mushroom garlic minute in a food processor for a quick rough chop or just do this with a knife and cutting board.

4. Drizzle olive oil and vinegar, and salt and pepper to taste. Top cheese with mushroom tapenade and presto! Serve with bread, crostinis, or crackers and enjoy!


Welcome to your weekend! -KB

Monday, October 4, 2010

Fun with Fungus

**Mushrooms are great on cedar grilling planks! Check them out at our Outlet Store!

Two words- bumper crop. These several syllables are enough to make me grab my rain jacket, hiking boots, and a five gallon bucket for a quick trip to Olympia, Washington.

Chanterelles (cantharellus cibarius), start popping up in the Pacific Northwest in autumn and continue to bloom, especially after heavy precipitation, until the first heavy frost. Every season is different, but this year will be talked about by local mycophiles for some time. "Remember the windfall of 2010," they will wistfully say, recounting the haul.
The sizable mushrooms yield this season is possibly due to the unusually wet summer, but then again, there are a plethora of other factors at play- fungi are a mysterious eukaryote and can be hard to predict when, where, and in what quantity they will pop up, if at all. Whatever the contributing factors may be, there are a lot of mushrooms out there ready for the picking this season. But before one goes tromping out into the woods with high hopes and a bucket, you should know how to identify the mushroom you are hunting and hopefully gathering. It is important to know the physical appearance of the fungus in question and the specific habitat type in which it can be found. Better yet, go with someone who knows what the heck they are talking about.

For wild mushroom hunters, Chanterelles, along with Morels, Oyster Mushrooms, and Puff Balls are some of the most popular types of mushrooms to gather and are pretty difficult to misidentify. However, only the most knowledgeable and experienced gatherer should collect from the hard to identify and toxic groups, such as Amanita.

So here's the skinny on cantharellus cibarius...
The Chanterelle are a strictly wild mushroom- mycologists have yet to successfully cultivate them. Chanterelles are a vibrant yellow-orange mushroom with a slightly convex cap that can be up to 7 inches across. The gills stretch from the stem all the way to the frilled edges of the cap. A mature specimen is funnel-shaped with no separation between stem and cap. I read somewhere that this particular fungi supposedly smells like apricots, but I found that they smell vaguely of, well, mushrooms- that is, sort of damp and musty.

Chanterelles live in a symbiotic relationship with live trees, gathering pre-photosynthesized carbohydrates while the tree in turn, is provided with additional moisture and minerals. In Western Washington, Chanterelles are most commonly found in forests dominated by grand fir in highly precipitous areas.


The correct method of harvesting Chanterelles is as follows...

1. Find them!

2. Cut the cap and part of the stem out of the ground, leaving a portion still connected to the mycelium network. This helps ensure that the patch will keep producing.

3. Leave teeny-tiny and old, soggy-looking specimens in the ground. You don't want them, I promise.


4. Plop the freshly harvested mushroom in your bucket and get them home before they get slimy.

5. Once safely home, removed humus and other debris.

6. Cook or dehydrate immediately to prevent spoilage.


Historically speaking, mushroom hunters were often aided by the use of a truffle pig- a domestic swine trained to smell out and extract particularly fragrant fungi, even as low as three feet underground. We were fresh out of truffle pigs, so Josie the Rott-mix hopped in the back of the rig and got to be our truffle hound. In this photo, we were playing fetch during out mid-day oyster harvesting break along the Hood Canal.
After the mid-day break for sunshine, oysters, and fetch, we trudged back to the less sunny, more drippy mushroom spot. There were tons of other frilly, lumpy, fuzzy, slimy, colorful, but all interesting mushrooms along the way. Here are some good examples of what Chanterelles do NOT look like.
Mushroom hunting and gathering has become increasingly more competitive with the rise of commercial pickers, due to the push for more organic, local, wild, etc., etc., foods in grocery stores. With this stiff competition, longtime mushroom mongers guard their secret spots jealously. I offered to dawn a blindfold for the drive, as to ensure I wouldn't return to plunder the spot, but my guide just giggled and said she "doubted I would be able to find my way back." So that is the story and I'm sticking to it, so don't ask. I couldn't find my way back if I tried.
All in all, we picked 45 lbs. of Chanterelles and had a full day of fun with fungus. This haul will keep me mycophagous for some time to come.

Welcome to your weekend! -KB

Friday, October 1, 2010

Fall Photo Sarfari

Autumn- as daylight declines, and the foliage changes, I finally have an excuse to bust out my extensive, albeit lumpy, sweater collection. This year at 8:13 p.m. PST on Sept. 22nd, the earth was neither tilted toward or away from the sun, signifying the first day of Autumn.

Fall is my favorite of all four seasons and not just because the warm weather fades to be replaced by cold, crisp sweater weather, that holds the promise of another ski season close at hand. Yes, the snow tease is tantalizing and all the "men folk" give us a much needed hiatus by disappearing to that seemingly mythical place- elk camp- but Fall is my favorite for one reason, plain and simple- the colors. The northwest does autumn colors as well as anywhere I have visited and my new Nikon and I have been out on a fall photo safari since the anthocyanin (red), carotene (orange), xanthophyl (yellow), started to overtake the greenness of the chlorophyll in the local vegetation.
Stay tuned for some autumnally awesome, fall-time favorite recipes.
Welcome to your weekend!
-KB